
Already with PDF Ink we can add any one of 41 types of barcode anywhere on a PDF page, but what if we could make the barcode a cool shape?


What about a violin shape when we sell PDF sheet music? A mountain range vista when we sell PDF maps? There are so many opportunities to get creative with barcoding, using this barcode generator. What follows is a guide on how to create barcode shapes while using TCPDF or SetaPDF Stamper with PDF Ink.
Start with Your Barcode
Unless your image is nearly square, you’ll probably want to use a 1D barcode. We will use the C39 barcode and the magic tags for WooCommerce Order Number and a Unix Timestamp (number of seconds since January 1 1970).
Let’s Barcode a Dog
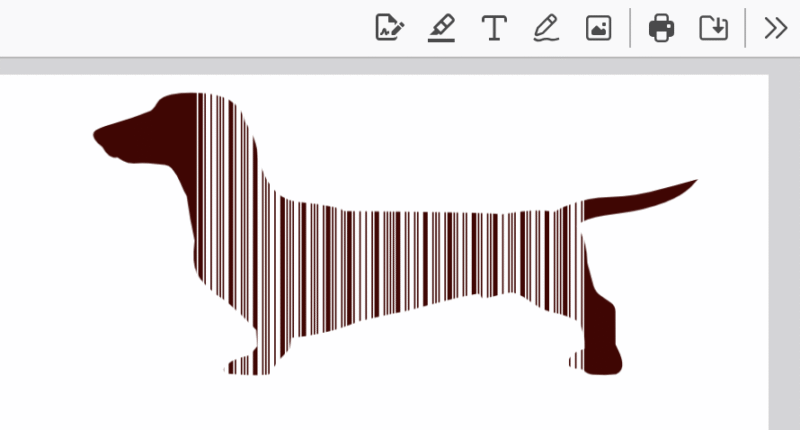
Usually we need a shape that allows the barcode to be scanned. Unless the head were level with the tail, and the tail more straight, this pup will not be the right shape for scanning. We are going to cheat by filling in “dead space” in the head and rear end/tail with the color black.
We will make three layers, stamping in the same place on the PDF page three times! To do this we will use placements #1, #2 and #3 of PDF Ink. The first layer in placement #1 will be the black background for the barcode.
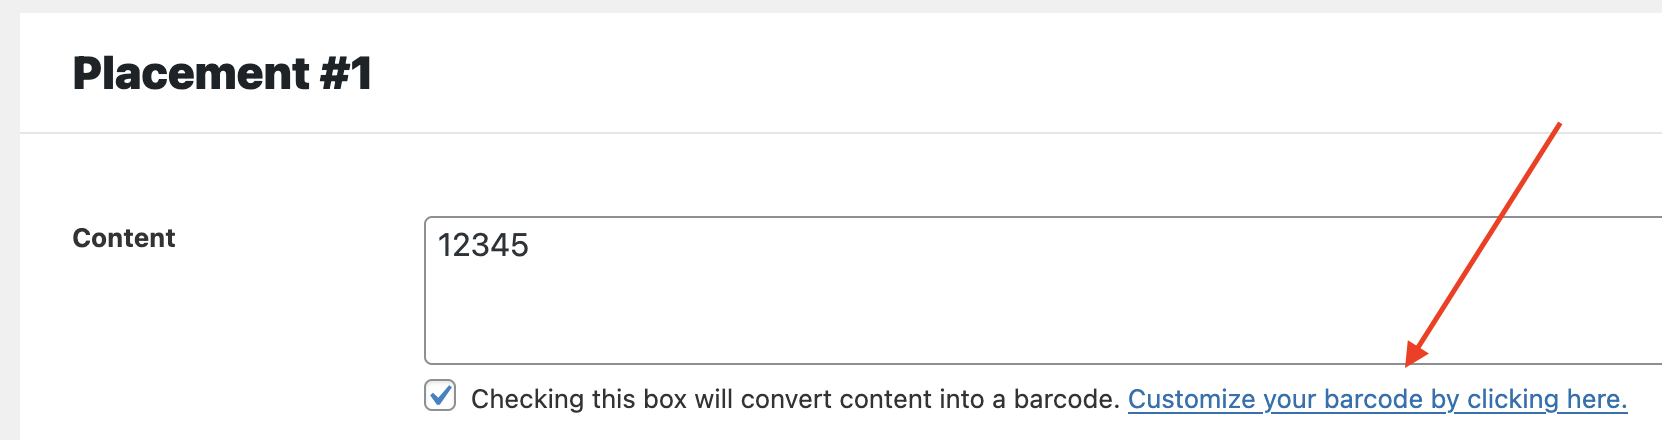
Placement #1
Here are what the settings for placement #1 look like:
The content can be anything, since we are just turning this into a block of color. Since all we need is a block of color, we could load an image in placement #1, but we will just play with a monochrome barcode since that’s available to us.
Using the barcode popup, we will chose a C128 barcode type of dimensions 58x29mm, with a background AND foreground of dark sable brown: rgb(69, 0, 0).
In the main Placement #1 settings, we set the x-adjuster to 6, to move the block of dark brown 6mm over to the left. The PDF Ink x and y fine tuners can be used to move the barcode anywhere on the PDF page. We’re going to place our barcode on the top right of the page by changing this placement to RTL (right to left). It will measure from the right edge of the page instead of the left.

Placement #2
We will create the bars for the barcode with placement #2, covering some of the work we just did with #1.
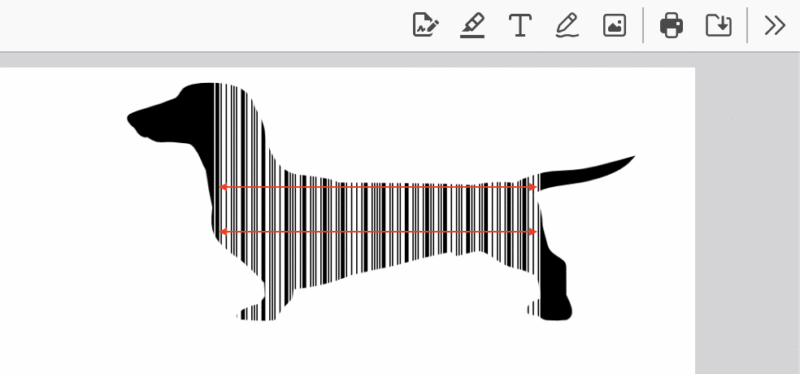
There is a reason for this. Because of the odd shape of our pup, we can only have barcode in the torso area. The scanner needs an area of full width where it can catch all the bars together, like between the red arrows in the image below:
The head and tail will be dark-colored. (If there was another mid-tone color you’d want to use with enough contrast for black bars to show against, you would not need placement #1.) Because our page is white, our dog shape will be dark, which means maybe our barcode bars should be white! Barcodes can be color-reversed, but the first and last marker bars must be distinct from its background. In other words, our first and last bars must stand out on the background color. Our barcode bars will be white. This is unusual, but it still works.
These are the settings for placement #2:
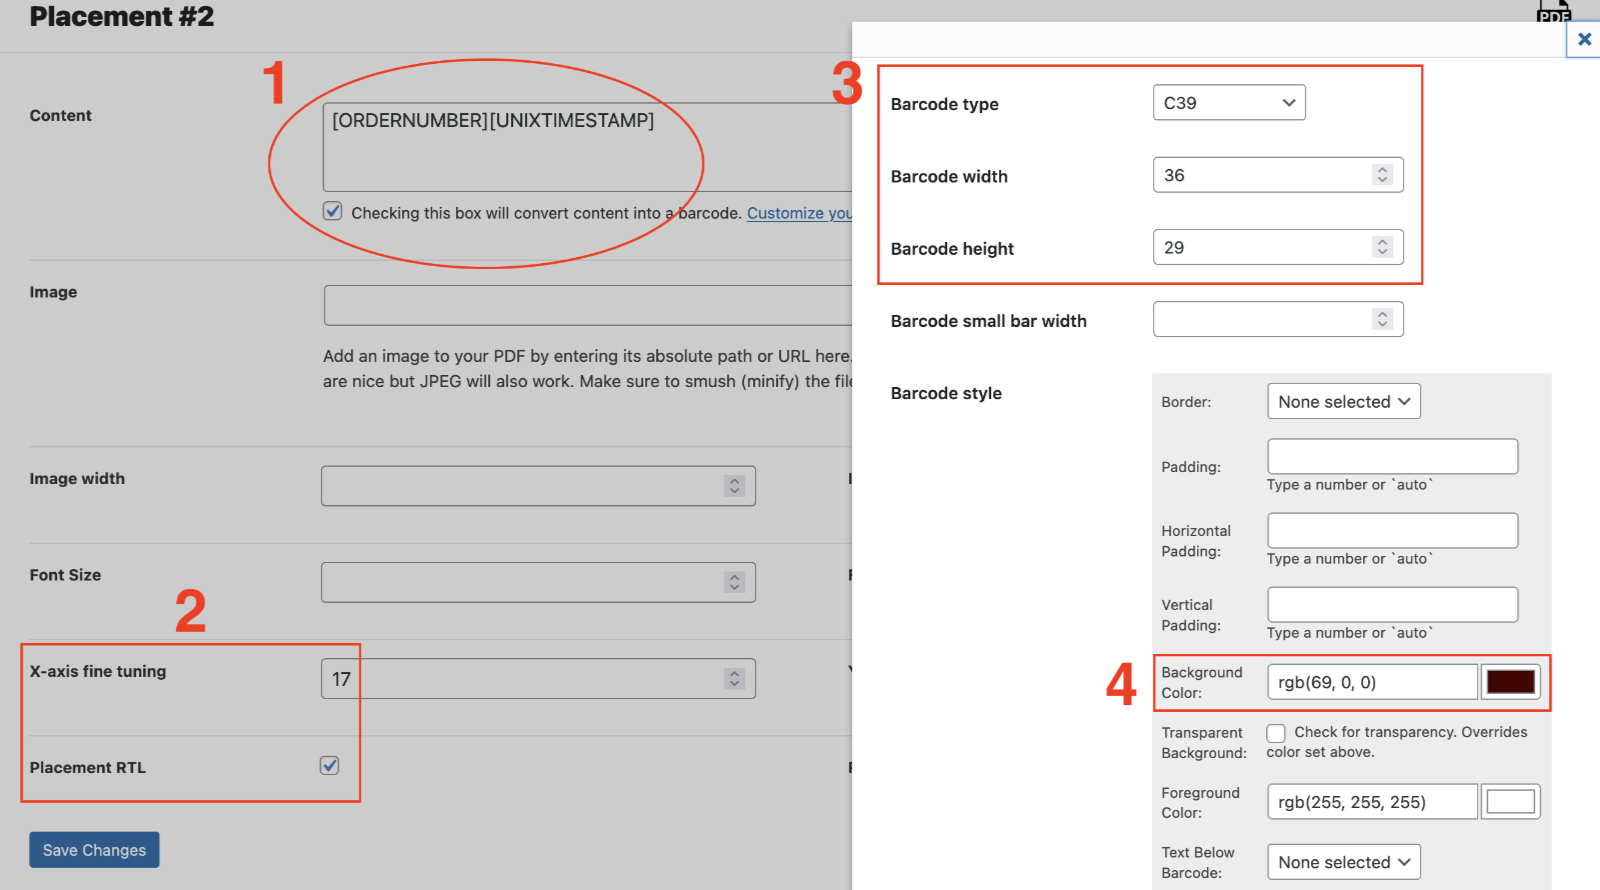
- We are using the [ORDERNUMBER] and [UNIXTIMESTAMP] magic tags to create a number composed of the WooCommerce (or Easy Digital Downloads or Download Monitor) order number and the Unix timestamp (number of seconds since January 1 1970).
- The content is moved 17mm over from the right margin, and RTL is checked for the placement to make this flip possible.
- We are using the C39 barcode type. The barcode width is 36mm, about as wide as the dog’s torso, and the height is tall enough to go a bit beyond his height.
- The bars are white and the barcode background is the dark brown RGB color: rgb(69,0,0).
Placement #3
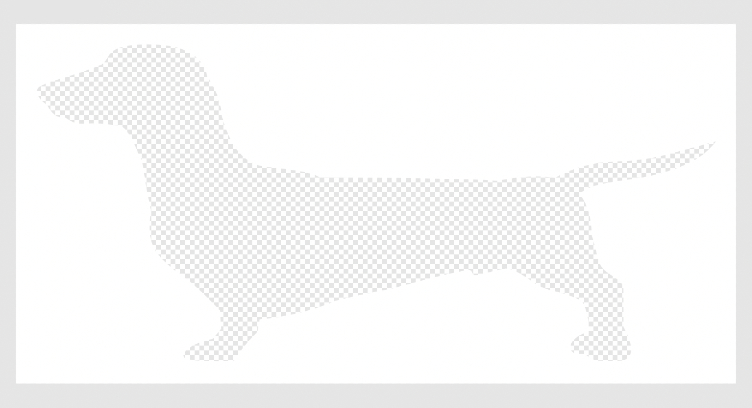
This “layer” of watermarking is going to become our mask. It is comprised of a transparent PNG image with a white background and a dog-shaped cutout:
We started with a free vector downloaded from Freepik.com, massaging it until it represented a cutout in the middle of a white block. It is a 750×350 pixel transparent PNG. The white area of this image will mask the two layers below, like a cookie cutter. We upload the dog image to the native WordPress Media Library.
Then we set the settings for placement #3:
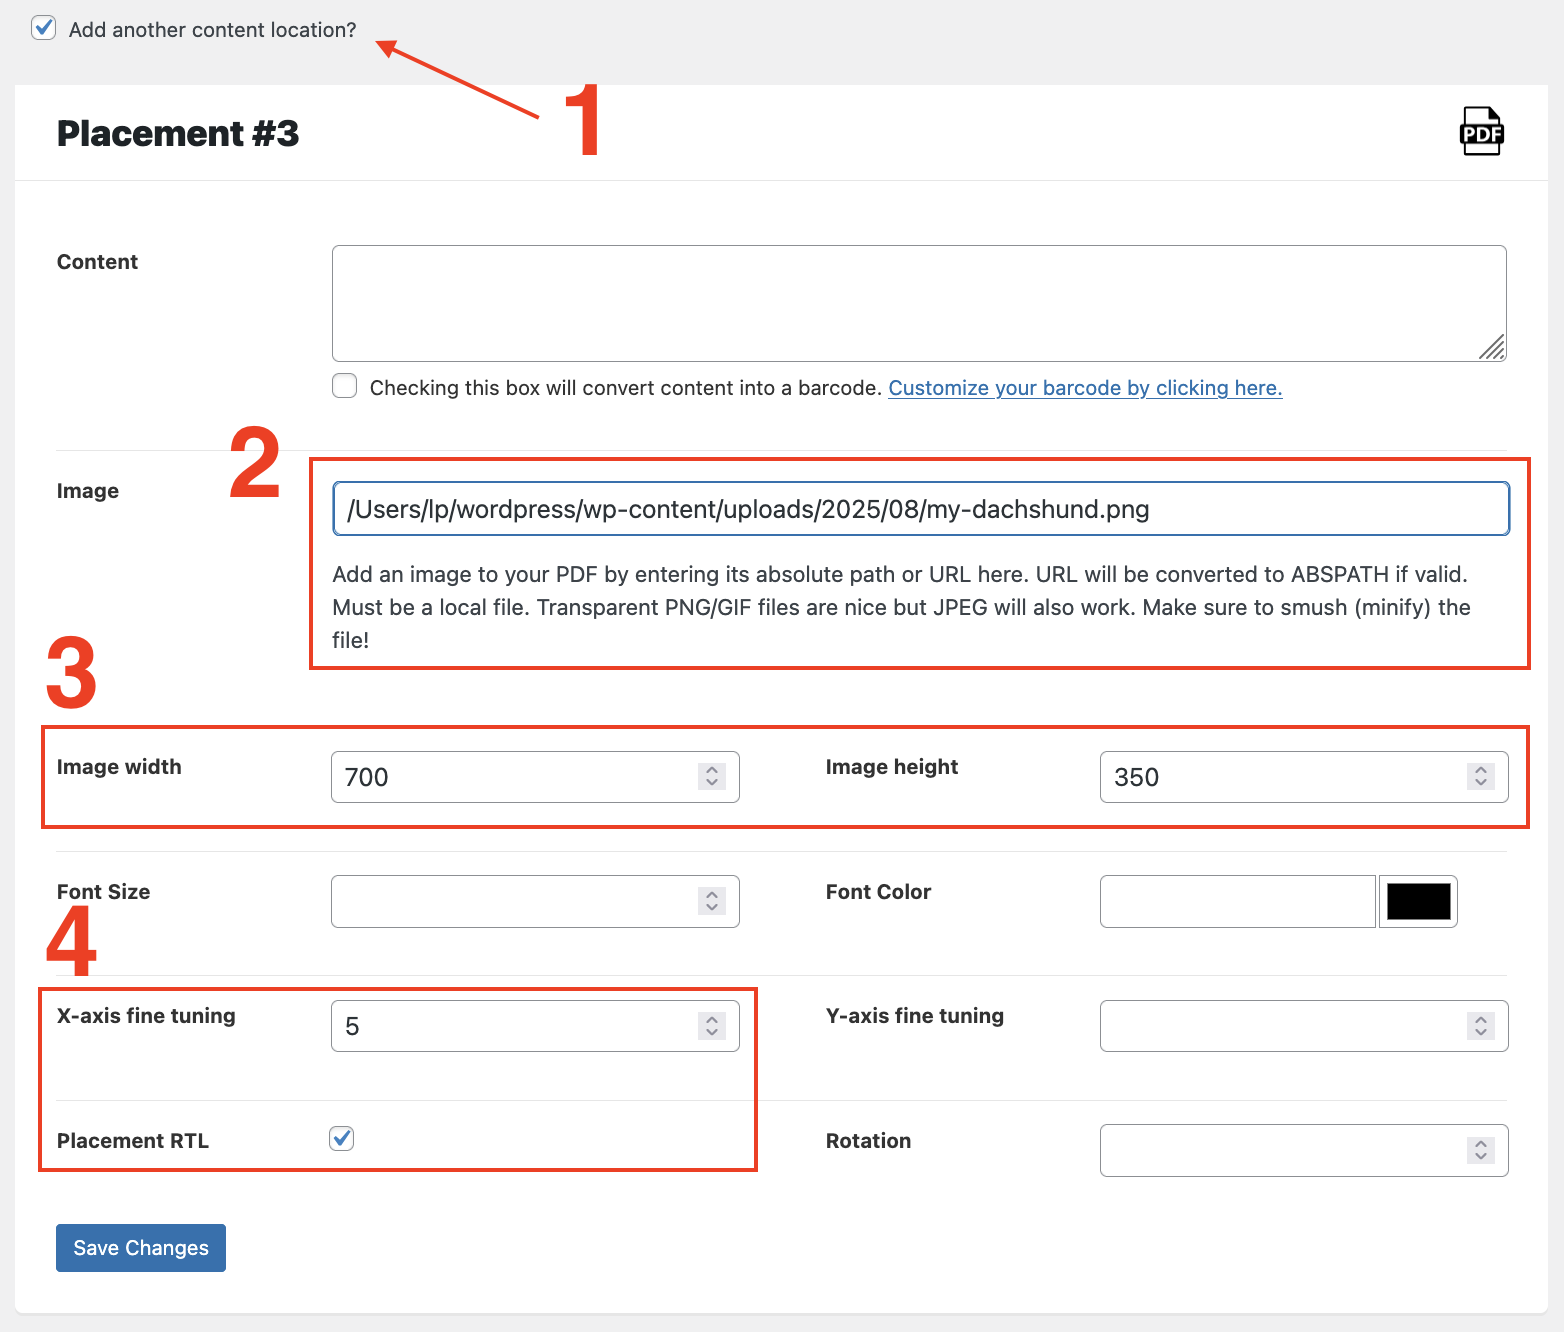
- Check the box under Placement #2 to show Placement #3.
- Input the image URL or absolute path here.
- Input the image actual size in pixels. It is best to not re-size your image programmatically. Have it ready, the size it should be, remembering that 1 pixel = (25.4 / DPI) mm. We used an image 700x350px, which would be 59.3 x 29.6px (the default DPI of TCPDF is 300dpi)
- We set this placement in RTL orientation and move the image over 5mm from the right margin.
To test our settings, head over to the Sandbox area of PDF Ink, scroll to the bottom and click the blue “Manipulate PDF” button. You can use your own PDF if you’d like, or just click the blue button to use the PDF Ink default PDF. Because you’re probably going to be using your own design and colors, you will want to play with the settings in the Sandbox until you have it set up just the way you like.
Get it? Bark code? 😋
We hope you liked this tutorial as much as we liked building it, and that we helped you have more fun barcoding your PDF files.