Are you using WooCommerce? Make sure you haven’t forgotten a step!
Setup
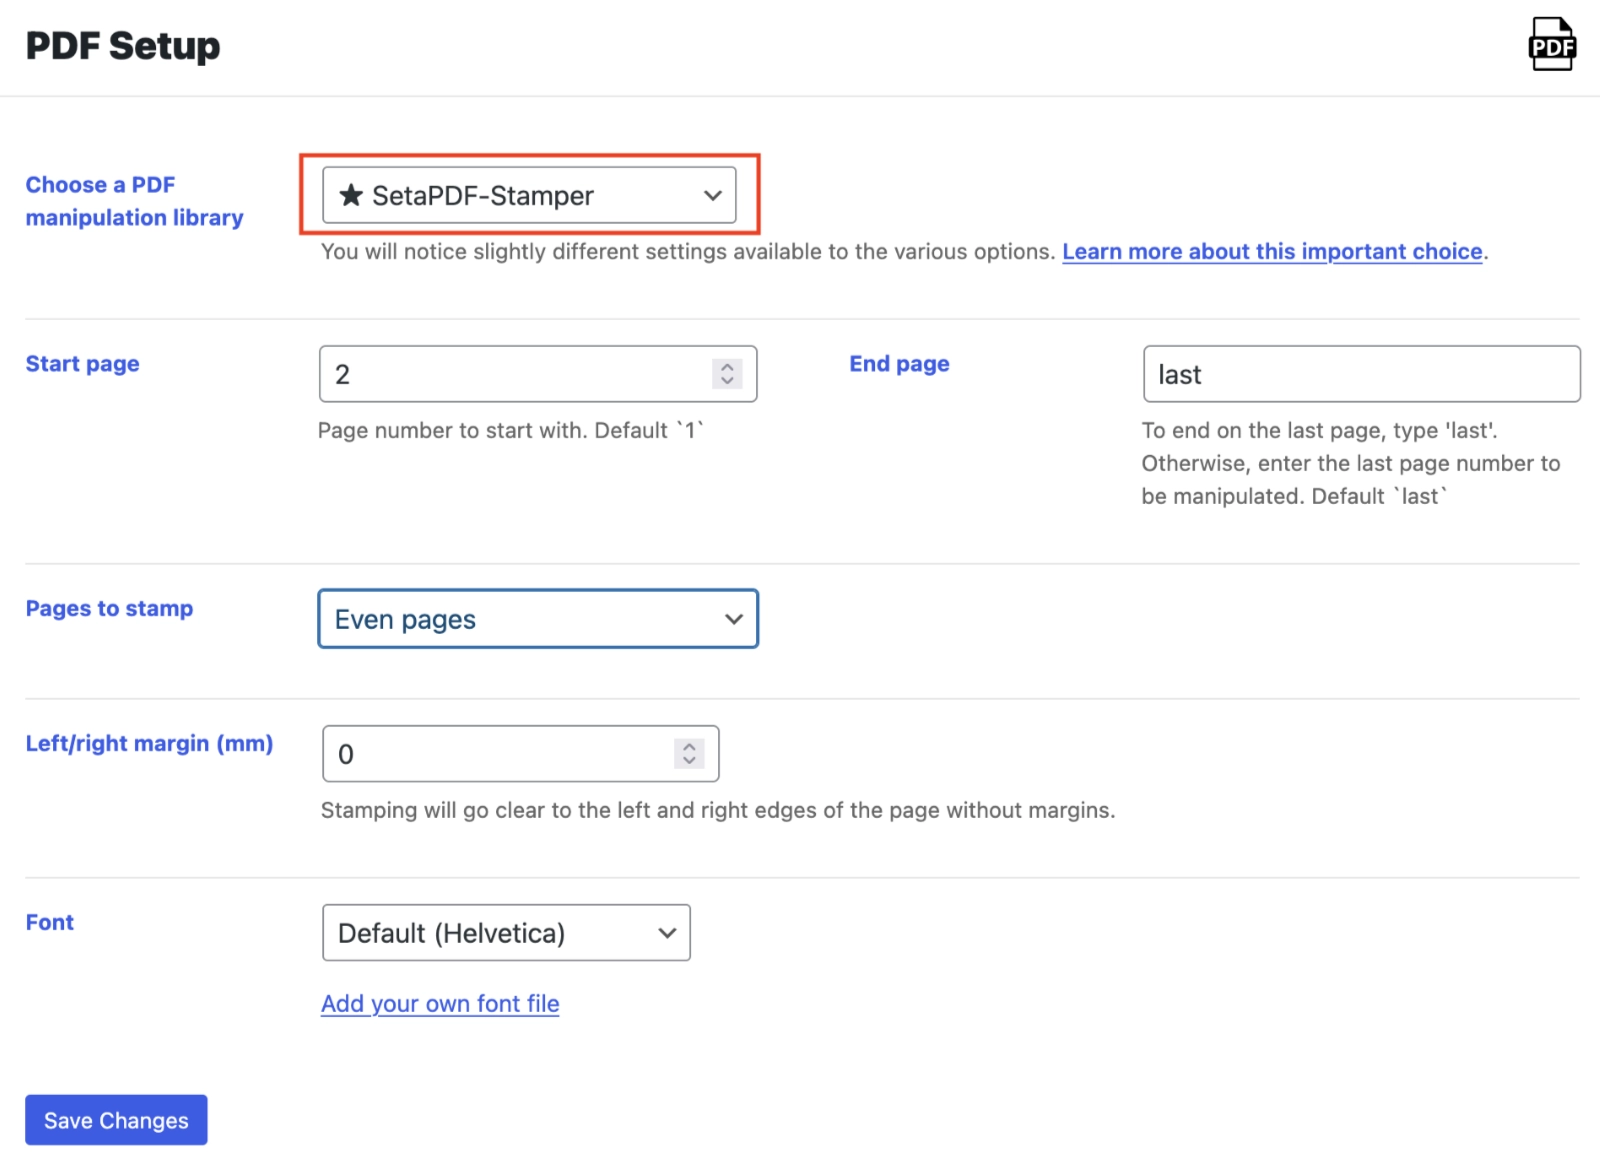
First – Choose a PDF manipulation library
In order to change an existing PDF, its dcode must first be read by a parser. Most parsers read the PDF code into memory, trying to understand the beginning, middle, and end of the PDF, based on the PDF specification (and allowing for some cases involving common syntax errors, e.g. malformations). The parsers are:
- Free/open-source FPDI
- Free/open-source TCPDI
- Paid/upgrade FPDI PDF-Parser from Setasign, and
- Paid/upgrade SetaPDF Core from Setasign (included with SetaPDF-Stamper)
The free version of FPDI is limited in that it will only PDFs up to version 1.4. The free version of TCPDI can handle PDFs to version 1.7 but is not maintained. Here is more information about choosing a PDF read/write library set.
Therefore, because these parsers are so limited, and because PDFs are so diverse and evolving, we will always recommend purchasing one of Setasign’s PDF libraries, either FPDI PDF-Parser or SetaPDF Stamper. If you have troubles with your PDF “not working,” we will recommend you purchase from Setasign. You are welcome to use the free libraries and it is very possible you will have good luck there; however, we will not guarantee it.

It is recommended you save settings immediately after choosing a library, since each library has a slightly different set of the following settings.
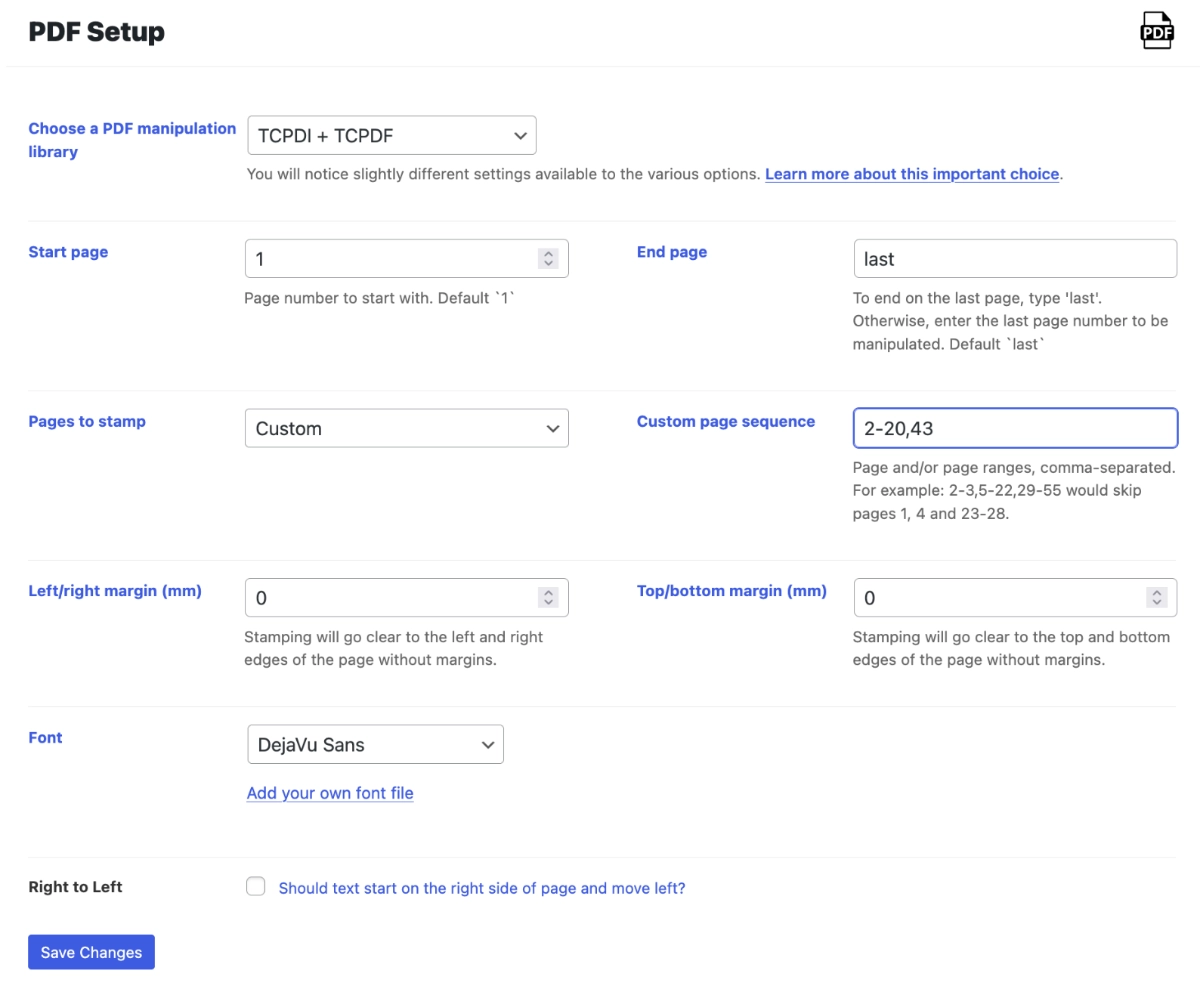
Start Page
Enter the number (1 or 2 or 5, for example) you wish inking to begin on. If it is the first page, enter 1. If you only want the last page watermarked, choose “Last Page Only” on the Pages to Stamp setting.
End Page
If you want inking to end on the 25th page, enter 25. If you want inking to go to the last page, enter “last” (without the quotation marks).
Pages to Stamp
This setting is self-explanatory once you see the dropdown options. However, there is one setting, “Custom,” which maybe needs explaining. If you choose custom, another text field will show up where you can enter a string of the pages you wish to be inked. Here are some examples of what you could type:
1,2,3,4,28-59 (this means all pages except 5-27)
3-7,12-19 (this means all pages except 1,2 and 8-11)
Left/Right Margin and Top/Bottom Margin
The margins set a “fence” on your PDF which inking will try to stay inside. If your margins are 0 (zero) then any watermarks you add can go right to the edge of the page. This setting is in millimeters by default.
Font
Each library comes with its own font set, and fonts for each library are stored separately. When you select a library, click Save Settings, then proceed to font selection.
When PDF Ink plugin is first loaded, fonts are moved from the plugin folder to a wp-content/uploads/pdf-ink/fonts folder. If that folder is accidentally emptied/deleted, you may have trouble watermarking. PDF Ink does make attempts to ensure fonts are always available for stamping, so try not to sweat it too much.
IMPORTANT: If your text contains characters like д φ or é, accents, tildes, breves, carons, cedillas, dots, etc., e.g. your language is not English, then maybe do not use FPDF, and do not use the base fonts included with PDF Ink: Helvetica, Times, Courier. If your selected font isn’t subsetted for characters anticipated in your watermarks and/or the font isn’t embedded in the PDF, characters might show up as boxes □ or � question marks.
TCPDF supports UTF-8 and comes bundled with the most fonts. To support other languages from around the world, we have included various other fonts which are generously subsetted. Select the “Deja Vu,” “AE Furat,” “AE Al Arabiya,” “M Sung,” “Kozmin Pro,” or “Kozgo Pro” font in the Settings panel if your language uses accent characters. To see if your language will be watermark-able with the Deja Vu font, view this chart. Select Furat for Arabic script, or M Sung for Chinese, Kozmin or Kozgo for Japanese. Fonts which come with TCPDF can also be added back in to the fonts folder; some were removed to keep this plugin as lightweight as possible.
Right to Left (RTL) watermarking is possible with TCPDF.
True Type Fonts (.ttf) can be added to any PDF Ink library. Below the font selection setting you should see a clickable link to the Font Uploader. If not, you can navigate there via WordPress menu -> Pages to Stamp -> Fonts. This drag-and-drop feature allows .ttf font file inputs, and prepares the fonts for your PDFs. After a font is added, you will find it in the font selection setting, and can save that setting. Adding a font which is carefully subsetted for your needs can not only make your PDFs easier to read, but can save a lot of PHP memory, too.
If your library is SetaPDF-Stamper, your font file is stored but not processed at the time. It is processed during PDF manipulation, and further coding might be required to ensure the correct encoding and subsetting is used.
Right to Left (RTL)
If this checkbox is checked, the PDF writer will move from the right side of the page to the left, instead of left-to-right. Usually the writer starts at the top left (x = 0, y = 0) coordinates. RTL causes the writer to start at the top right (x = page width, y =0).
If RTL is turned on, negative x-axis tuner values (e.g. -10 or -22) can be moved to push content further to the left on the x axis.
Placement Settings
A placement is a spot on the PDF page where you will put some content. It can be anywhere on the page, and there can be more than one placement.
PDF Ink allows for 1 or more content placements on the page, naturally up to 4. We recommend one or two, but won’t stop you if you want more. 🚥
Adding Placements
Maybe get supernatural and have more than four placements by adding the following PHP snippet to your child theme functions.php file. This snippet will show settings fields for 6 placements per page:
add_filter( 'pdfink_placement_number', function( $num, $source ) { return 6; }, 10, 2 );Each placement has the following content settings:
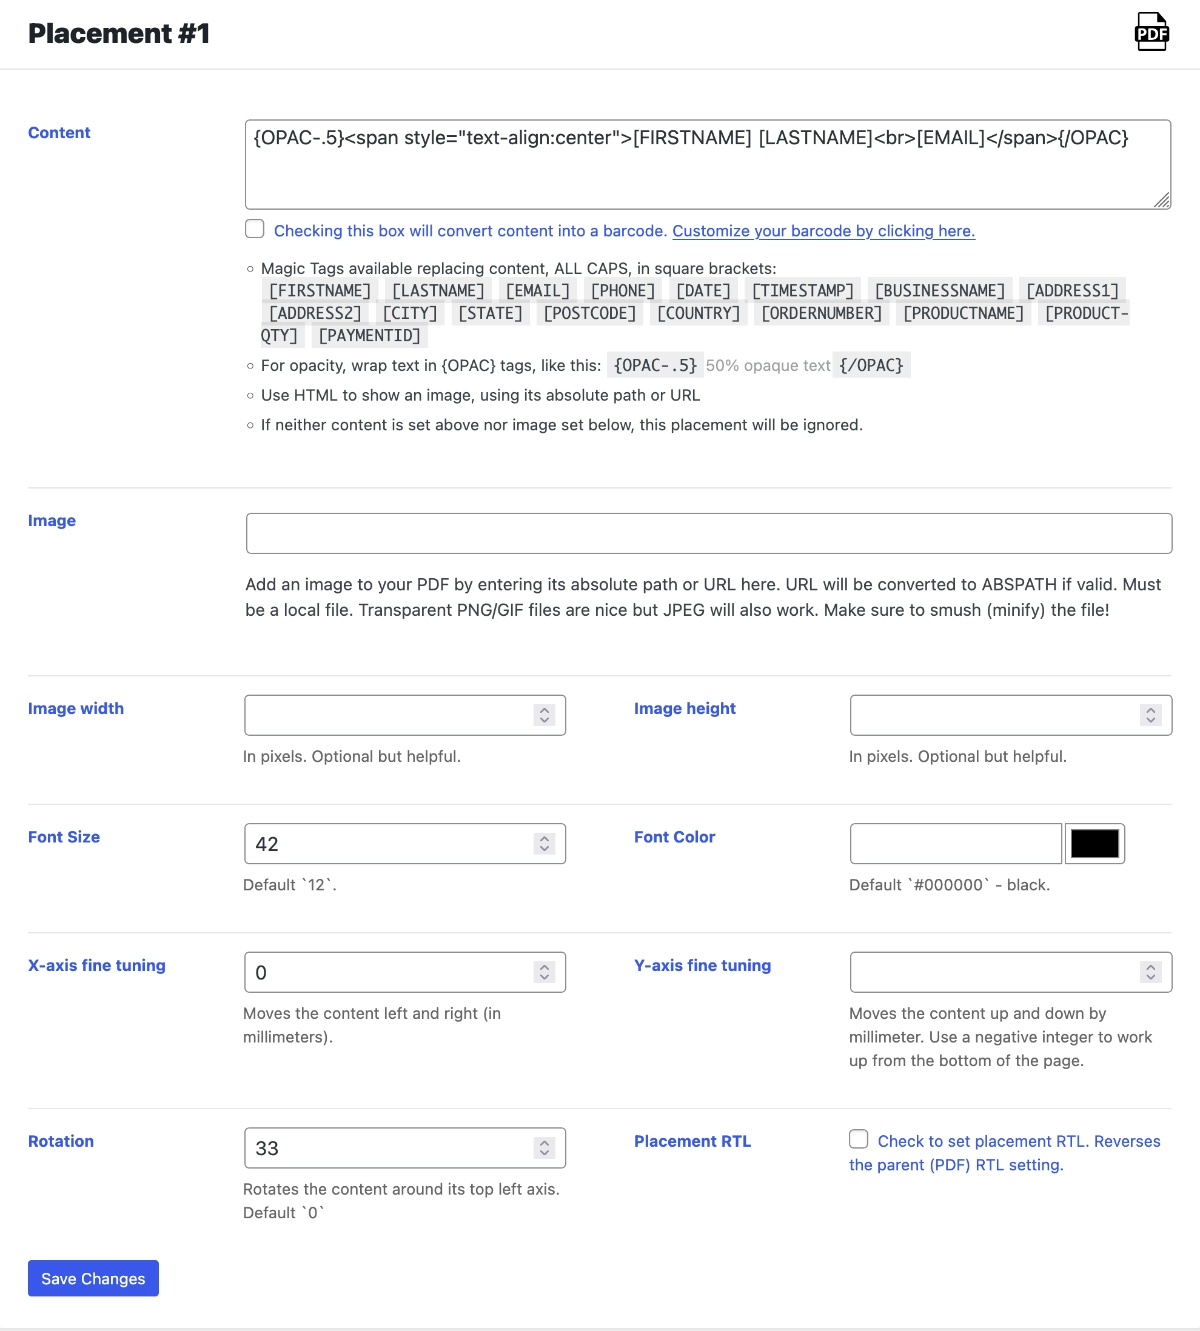
Content
A lot can be done here, or nothing. If nothing is entered as content, no watermark will show. Maybe you only want to password your PDF. That is fine!
Other people might just type “not for distribution” or “draft” or “sample” or “confidential” here, click save, and be done. Default settings will take care of the rest. But keep reading to learn how to make your watermark content truly customized by size, color, x/y position, etc.
Many “magic tags” are available to help create dynamic content. Learn more about magic tags here.
HTML in Content
If you are using TCPDF, HTML is allowed. TCPDF allows these tags: <a> <b> <blockquote> <br> <dd> <del> <div> <dl> <dt> <em> <h1> <h2> <h3> <h4> <h5> <h6> <hr> <i> <img> <li> <ol> <p> <pre> <small> <span> <strong> <sub> <sup> <table> <td> <th> <thead> <tr> <u> <ul>
If you want to center watermark text on the page and are using TCPDF, you can use an HTML <span> tag for that. The following would work to create some centered, and italicized text:
<span style="text-align:center">Some centered and <em>italicized</em> text!</span>If using an <img> tag in your stamp content, the image width and height attributes must be set. Transparent images make great watermarks, just make sure to use a small image file (smush those bytes)!
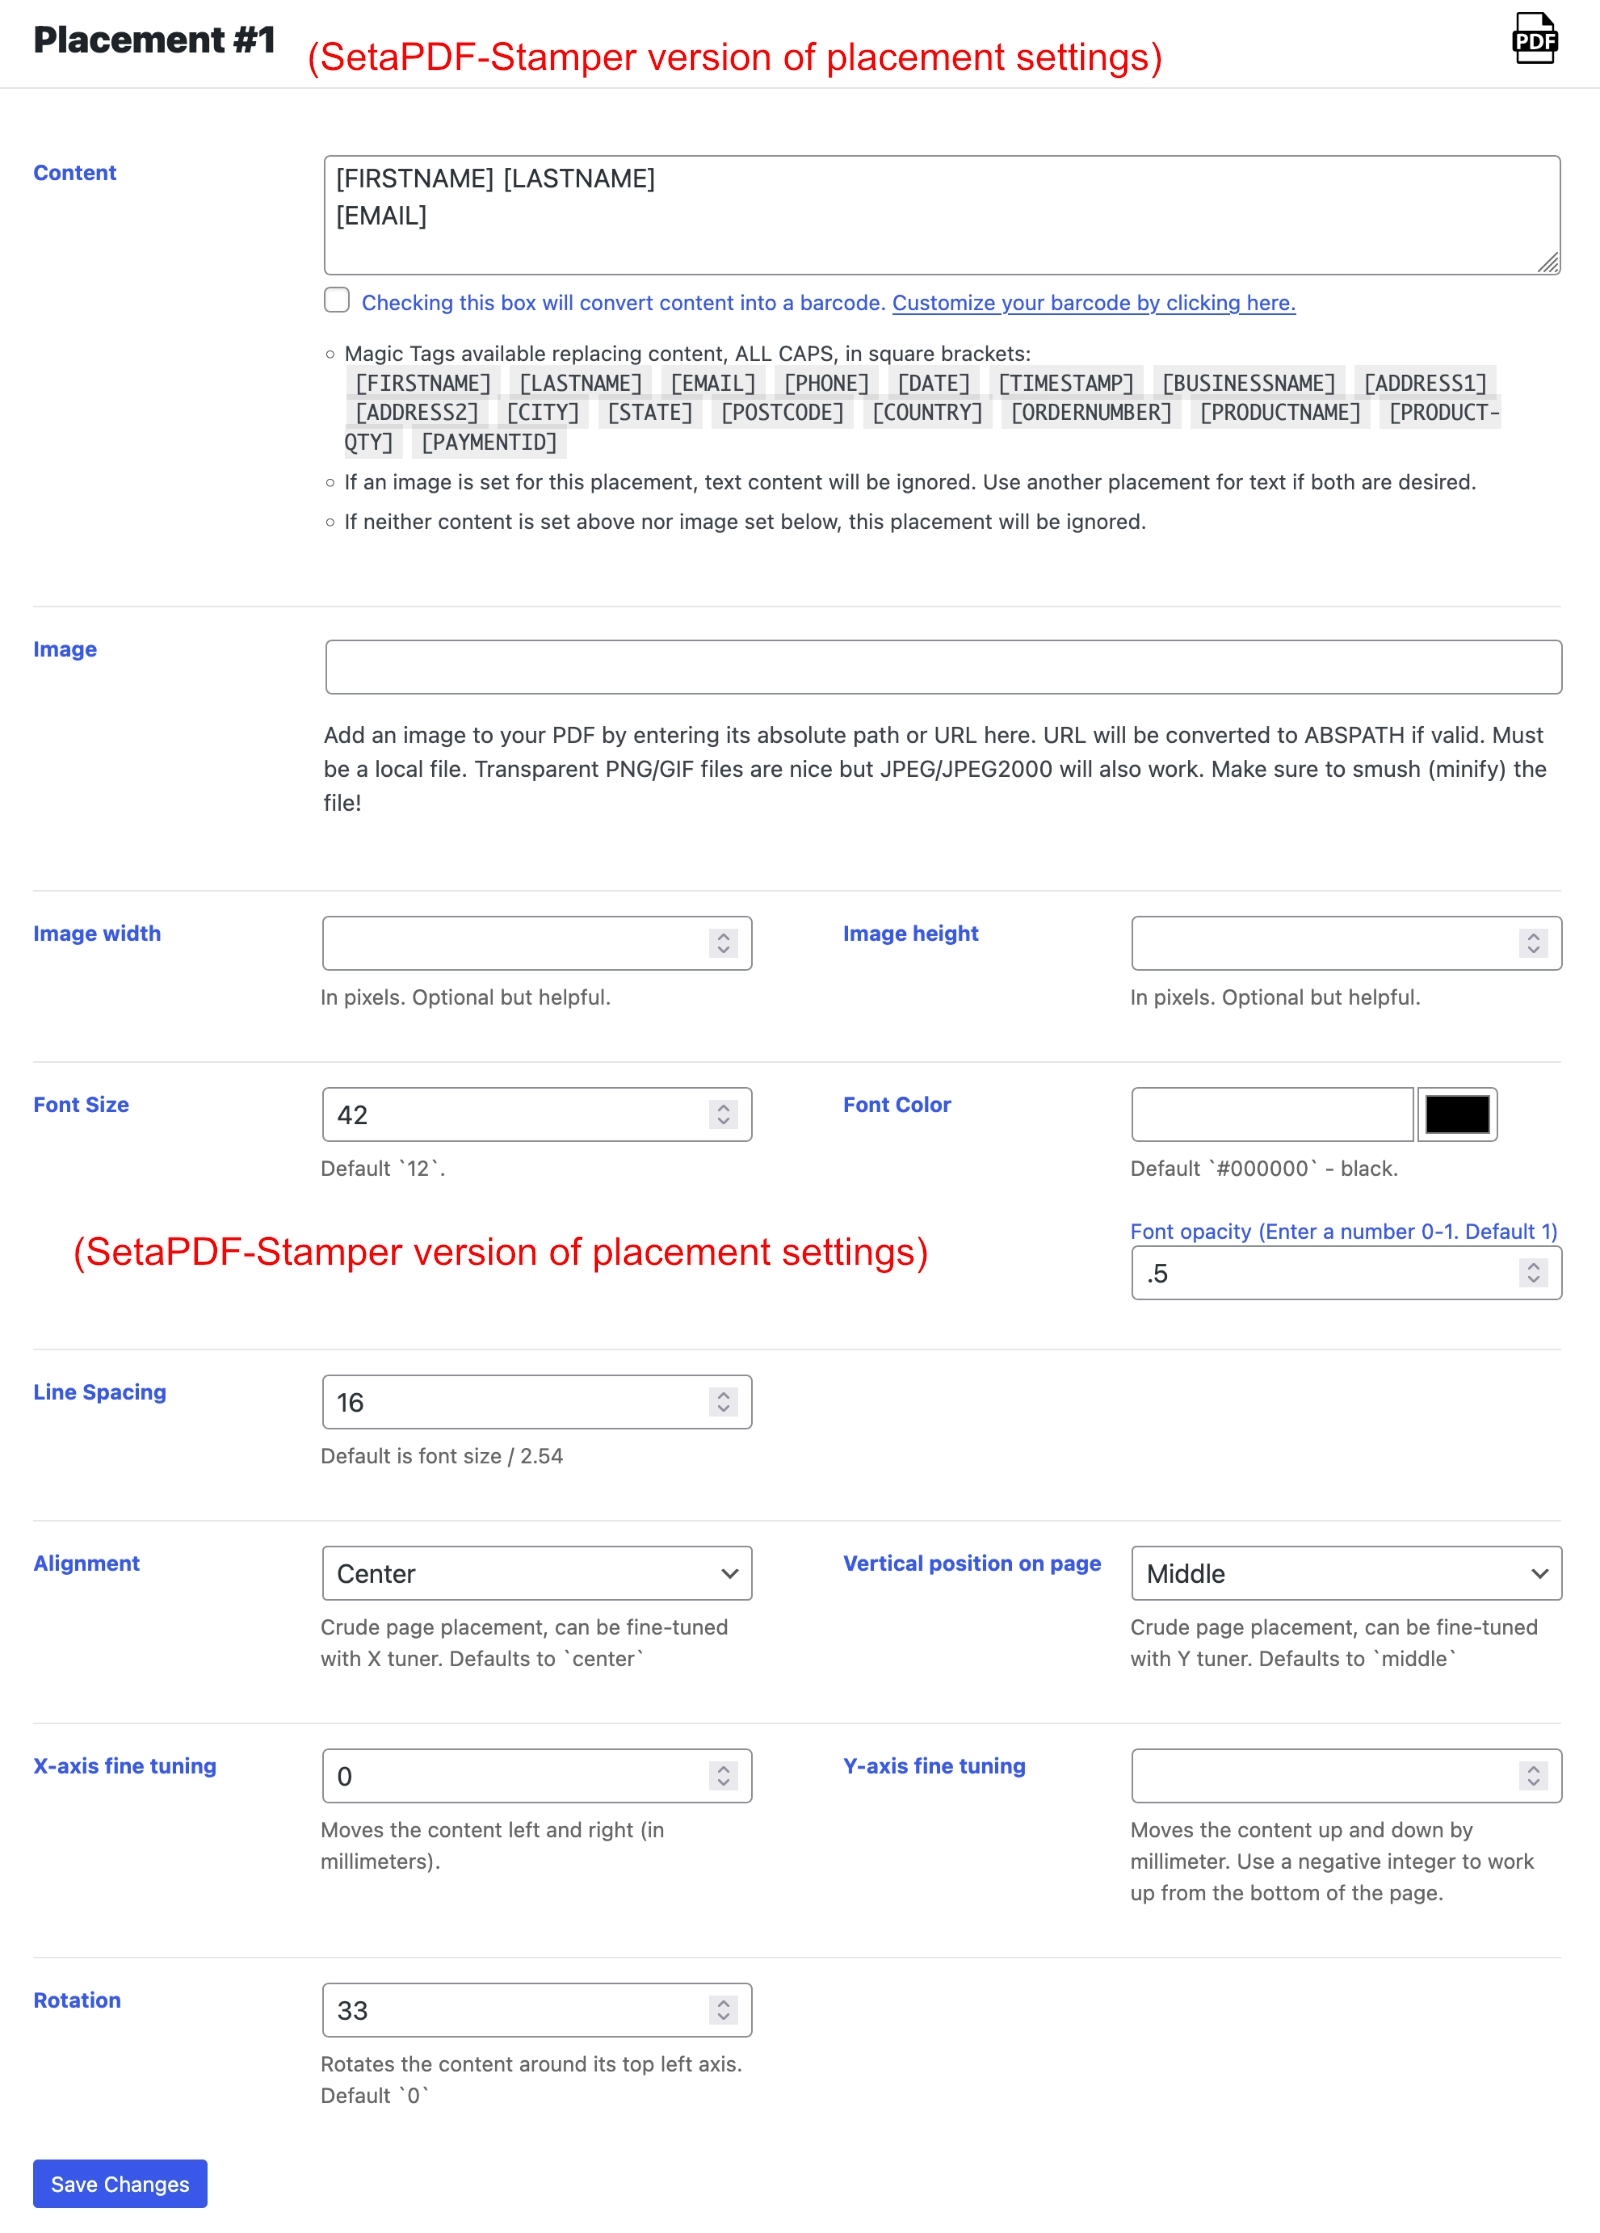
There is no HTML allowed with FPDF and only a little HTML is allowed in SetaPDF-Stamper. SetaPDF-Stamper started allows these tags: <div> <span> <b> <strong> <i> <em> <sub> <sup> <u> <br> in version 2.41.0.1834. SetaPDF-Stamper started allowing the <a> tag in version 2.49.0.2199.
Images as Content
PDF Ink comes with four possible placements* and each one can have an image, barcode, or text content. (These can overlap with FPDF and TCPDF, giving 8 built-in stamps per page, but YMMV.) To add an image to your PDF page, simply fill in the following settings:

Image Path
Though this setting is ultimately saved as a file path, you can enter a URL in the settings field and it will be converted to a path for you. Make sure the image file has permissions 755 and is stored on the same server as your PDF Ink installation.
Supported formats are JPEG and PNG images without GD library and all images supported by GD: GD, GD2, GD2PART, GIF, JPEG, PNG, BMP, XBM, XPM;
If no dimentions are set, the image is output at 72dpi.
- gray scales
- true colors (24 bits)
- CMYK (32 bits)
- gray scales on at most 8 bits (256 levels)
- indexed colors
- true colors (24 bits)
Width
Set the width in pixels (optional).
If using FPDF, this setting can be used to set the DPI. Use a negative integer (e.g. -300) to set the DPI.
The default base measurement unit for TCPDF is the millimeter (mm) and the DPI is 300. Your pixels are converted to millimeters for you, so enter the image pixel width in this setting.
Height
Set the height in pixels (optional).
If using FPDF, this setting can be used to set the DPI. Use a negative integer (e.g. -300) to set the DPI.
If either width or height is not set, the base image width and height will be assessed by the parser to keep original proportions. This computation is done in pixels and not millimeters, so you may see distortion. It is best to enter an image width and height in the PDF Ink settings.
DPI (Dots Per Inch)
If your PDF has many images, you might want to drop the DPI to cut down server load and file size. Default is 300. For most PDF images, a DPI (dots per inch) of 300 is a good balance between quality and file size, especially for printing. DPI can be changed/filtered using a PHP snippet like the following with PDF Ink:
function pdfink_change_image_dpi( $dpi, $i, $p ) {
    // Maybe you want a slightly better DPI on page 4:
    if ( 3 === (int) $i ) return 200;
    // Maybe you only want a high quality DPI for print on the 2nd placement, every page:
    if ( 1 === (int) $p ) return 400; // wow, high quality! big file!
    // All other images can be 100 DPI:
    return 100;
}
add_filter( 'pdfink_filter_image_dpi', 'pdfink_change_image_dpi', 10, 3 );
You will want to edit this snippet to suit your needs, and if using WordPress, place it in your child theme functions.php file.
Using HTML to Add Images (Alternative Method)
When using TCPDF, images can be stamped onto PDFs using HTML. This is great for adding a logo or an image watermark to a PDF right in an HTML string possibly also containing text, and can lead to creative and impactful results. With TCPDF, use an HTML <img> tag to add your image. If you need help with this, just get in touch.
As an example, the next block of HTML would embed an image in your PDF (TCPDF only):
<img src="../../relative/path/to/your/image.png" width="400" height="300">The next example of HTML use would center the image left-right on the page:
<span style="text-align:center"><img src="../../relative/path/to/your/image.png" width="400" height="300"></span>The image src attribute needs to be a file PATH on the same server as PDF Ink, not a URL. The image width and height should match the actual image width and height because TCPDF uses Imagick to immediately get file details including width and height and uses those. So if you are thinking you can resize using width=”” and height=””, think again. Imagick will force the use of the original image size. So edit your image to exactly what you need in Photoshop or Affinity Photo (or other), first. Again and finally, TCPDF uses Imagick, so make sure Imagick is installed on your server, and that its version is compatible with the version of PHP you have selected.
Barcodes in Content
We’ve put together a separate guide about putting barcodes on your PDF pages. This is for TCPDF and SetaPDF-Stamper users only.
Font Size
Font size is a numeric input. Fonts are sized in points by default.
Font Color
Font color input is expected in HEX format, e.g. #CC0000. A color selection tool is there for your convenience. Default is black.
Bold/Italic
(FPDF only) If bold and/or italic is checked, all the text will be bolded and/or italicized. Finer control is possible with TCPDF, which allows for using the HTML <strong> and <em> tags ad lib inside your sentences, rather than having to italicize or bold entire placements.
Font Opacity
The Opacity setting changes the entire content placement’s opacity. Enter a number between 0 and 1 (in hundredth increments) in the settings to change away from the default which is 100% opaque (0% transparent).
Opacity and Magic Tags (TCPDF only)
In TCPDF, you can use the special tag “{OPAC}” to indicate a block of transparent text in your content. If you only want part of a sentence to have transparency, then the {OPAC} tag is handy.
If you are using TCPDF and have access to customer data because you’re using Woo|DLM|EDD, the following content would look like a 25% transparent read out of the customer’s first and last name, email, and a date 1 year out from purchase:
{OPAC-0.25}Licensed to [FIRSTNAME] [LASTNAME] (email: [EMAIL]), expires: [DATE-1YRS]{/OPAC}Notice the closing {/OPAC} tag, which is important, too. This example also uses PDF Ink “magic tags,” so we’ve gotten a little ahead of ourselves.
TIP: totally transparent (invisible) watermarks are a great way to trick and catch pirates. 🏴☠️
Line Spacing
(For SetaPDF-Stamper) Space between lines of text. By default this is font size / 2.54 (font size divided by 2.54).
Alignment
(For SetaPDF-Stamper) Left, Right or Center of the page.
TCPDF/FPDF do not have an “Alignment” setting. You can use HTML to center align with TCPDF.
Vertical Positioning
(For SetaPDF-Stamper) Top, Middle or Bottom of the page.
X-Axis Fine Tuning
Use this setting as a tool to fine-tune the position of your content on across the page on the X axis, one millimeter at a time. 0 is the left of the page. This tuning value is added to your margins.
Y-axis Fine Tuning
Fine-tune the position of your content up and down the page on the Y axis, one millimeter at a time. Moves from the top of the page by default. 0 is the top of the page.
HOWEVER, if you use negative integers (e.g. -10 or -20) you will be moving from the bottom of the page, millimeter by millimeter. So if you want your content box to start 3 centimeters from the bottom of the page, enter -30 (30 millimeters is 3 centimeters). If you want your content box to start 3 centimeters from the top of the page, enter 30 (positive integer).
This tuning value is added to your margins.
Rotation
Enter 1-359 if you wish to rotate content. Rotation occurs counter-clockwise.
Rotation occurs from the X/Y axis point, which is also the top left corner of the placement content box. If using TCPDF, this is the same whether RTL or LTR. If you are using SetaPDF-Stamper, the rotation axis starts from the center of the page.
The X axis is determined as a combination of left/right margins + x-axis finetuner, and the Y axis is determined as a combination of top/bottom page margins + y-axis finetuner.
Use watermark rotation along with margins and fine tuning to bring your watermark vertical along the right or left margin of the page — great for sheet music!

🎡 Rotation example
For a vertical mark on the left margin, try setting your left/right margins to 0. Set x-axis finetune value to zero and a y-axis finetune of -10, then rotate 90º. This will put a mark along the left margin of the page. You have rotated 90º counter-clockwise from 0, -10 (x, y).
Possible rotation hiccups
- If you do not see your mark after rotating it, it is because you have rotated it OFF the page. If your mark is several lines tall, increase your x-axis finetune value to 10+ to see it again and prevent it spilling onto a blank page.
- If your mark is not fitting entirely on the page before rotation begins, it will not rotate in whole. You might see your text continued on a blank page in a horizontal line.